
One of my favorite things to do in Power BI is get creative with bookmarking, and last week I received a question that made me think of this idea.
Essentially, I was asked if it is possible to use bookmarks to switch between a default Tooltip and a fancy Tooltip page. The short answer is “No”… as bookmarks do not capture the state of the formatting, and tooltip type comes from the formatting. But this made me think about how to make something like this work, and after a little bit of playing I was able to come up with a solution.
To be blunt, this method is not for bookmarking newbies, and the use case is pretty narrow, but I wanted to share it, as I imagine it will get a lot of people thinking outside the box when it comes to bookmarking.
Solution
What we want to do here to work around the problem of Bookmarking not capturing format state by creating a two states for our Tooltip Page, and using bookmarks to swap them back and forth.
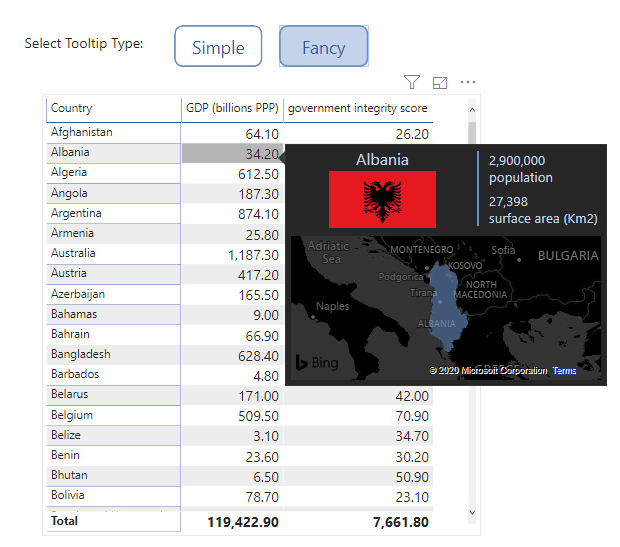
I have a Matrix of GDP/Gov Integrity Score by Country that I want to be able to add additional context to via the tooltip page feature. For guidance on how to design tooltip pages, check out Power BI Tooltip page Guidance

My First tooltip is going to be a matrix that provides additional data points for the country that we hover on:

Next I will hide my table and build out a “fancy” tooltip, and group the objects:


Now I will create my Bookmarks that control which version of the tooltip is visible. They key here is to disable the “Current Page” option from the bookmark! This will allow us to call the bookmark and make the swap without navigating to the page:

Simple Bookmark activated Result:

Fancy Bookmark Activated Result:

Now we need to make this thing user friendly, which is where the real challenge comes in. If you have read my posts on User Friendly Drill Down, or In-Page Navigation, you have seen the importance of buttons for user experience, and formatting of buttons to ensure the users know where they are at all times.
I have added some buttons to select the simple or the fancy tooltip type, but I want to be able to have them change color depending on if they have been activated or not so our user can tell which type they are on

Well, in this case, formatting button state gets pretty complex, as we are calling on a bookmark that is impacting a separate page… not the one we are on. Bookmarks are tab specific, so it is not possible to modify the tab we are on and get the desired swap on the tooltip page.
This is where Conditional formatting of buttons, and some trickery with Slicers comes into play! By adding a slicer that has no relationship to our data (or all interactions to our visuals turned off) on the main page, and syncing it with the same slicer on the tooltip page, we are able to get the job done.
Adding the slicer
The field used in the slicer is really not important in this case, all that matters is that it does not impact our data/tables and it is able to be used in conditional formatting. For simplicity, I am going to create a new table with 2 values in it, 0 and 1. and add a slicer to our main page:

Next, I will add conditional formatting to our Buttons. “Simple” is going to darken when the “Status” slicer is on 0, and “Fancy” will darken when our slicer is on 1.
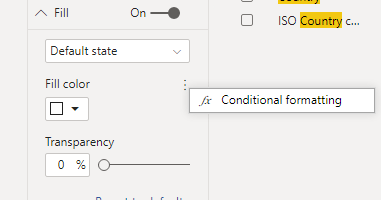
The option for Conditional formatting can be found in the format pane by hovering on the dots next to the various color selections. In this case I am going to conditionally format my Fill.


Here is the result of the conditional formatting:


This is great, but at this point it is not functional. To make this work how we want it to, we are going to need to do the following:
- Bring the slicer to our tooltip page and Synced with the main page
- Update our bookmarks to also modify the slicer while keeping it hidden
- Hide the slicer from our main page
I have copied/pasted my slicer from the main page to the tooltip and selected Yes to Sync the slicers:

Now, “Fancy” needs to be on the “1”, so I will change that, hide the slicer, and update my bookmark:

Next, I will activate my “Simple” bookmark, adjust the slicer to “0”, hide it, and update the “Simple” bookmark:

Testing the Buttons on our main page, we can see the slicer is working as intended. We can now hide the slicer on our main page, and we have a fully functional Tooltip Swap:

Conclusion
Bookmarks are incredibly powerful when creating user experiences in your Power BI Reports. While this example is fairly niche, it demonstrates the capabilities of the feature, and will hopefully inspire some creativity!

Why would a slicer be used as a conditional formatting flag, instead of a button which can be modified to whichever bookmark that has been set in the report?
LikeLike
The bookmark does not capture the formatting of objects, so you can’t for example say “when I activate this bookmark I want this button to change to blue”. Normally I would have two versions of each button (one filled and one unfilled) and swap them out with the bookmark, but in this case we are activating a bookmark that is actually on another page, so we cannot make the buttons on our main page swap out with the same click
LikeLike
an easier solution might be to swap the matrix visual on the main page out with an identical copy that has a different bookmark property. As long as users aren’t doing too much drilling or +/-…ing and the visual isn’t too slow to load, this eliminates the conditional formatting setup and actually lets you use the default tooltip, not a facsimile.
LikeLike
That’s a very neat approach, great work
LikeLike